Robin Hood Gearbox Change

Carlie’s Love of Motoring
From a young age I would spend weekends & school holidays helping out at my uncle’s garage. As a panel beater & sprayer he used to have some amazing vehicles come through the doors (some in worst states than others!), I would watch my uncle transform these cars in awe. Helping out where I could, usually making cups of tea, applying masking- tape & paper to areas that needed protecting such us the windows & wingmirrors, as I got a bit older I’d mix paints etc. My little fingers could easily get in the gaps my uncle’s shovels couldn’t! Grandad was always tinkering with bikes in his shed too, I grew to love & appreciate the world of motoring from these massive influences in my childhood.
When someone asks me to help I can’t say no…
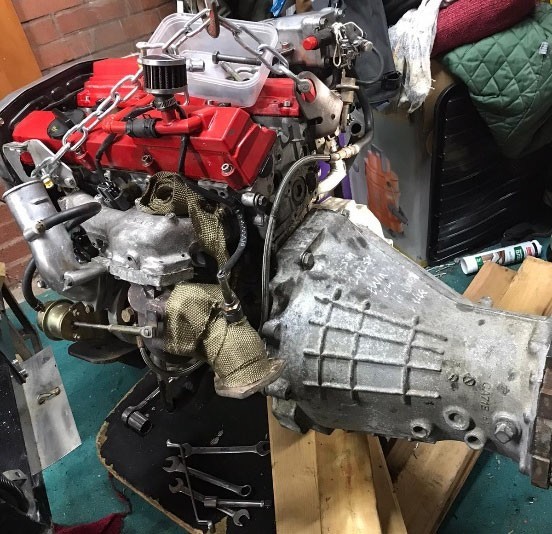
First up, get the car up onto ramps and axle stands then get that engine out! This proved harder than it looks, that engine fits in that bay really snug, and with the gearbox and shaft still attached there was quite a bit of chucklebrothers action going on, to me to you! But we got there in the end, with the engine hoisted by the crane we laid it down onto a wooden skate for easy manoeuvring as we were working in quite a confined space due to the weather outside. Getting the gearbox off the engine was easy enough, once we’d located the right sized socket!
“If you want to learn you need to do the work.”
Graham takes no prisoners!
Now it was time for the new gearbox to go on, but first Graham wanted to check the clutch disc whilst we had it all of the car… makes sense… until we realised we didn’t have a clutch alignment tool to put it back together again.
Anyway, clutch pad still in perfectly good shape so no need to change. Using a long screwdriver and many interlocking sockets we got it ligned up ready to go (with about 5 attempts, a couple of coffees and a lot of frustration). Once aligned correctly the new gearbox fit on like a glove and was just a case of putting all the bolts back where they were meant to be.

Time to piece it back together, back up in the air and with Graham guiding and me at the helm we managed to get it into position and resting on the engine mounts without too much trouble. Attaching the mounts involved getting my chubby little fingers in some tight gaps to find the threads but we got there in the end, but not without dropping various washers and bolts on my face in the process.
Engine in! Radiator and intercooler next and with Grahams custom built parts the tubing fit perfectly between them and the chassis, nice and snug with the end very much now in sight *wipes brow in exhaustion*.
One thing I wasn’t going to learn, or even attempt was the wiring, it’s a bit like spaghetti junction or looking in one of the telecoms boxes, unless you understand it don’t touch it. This was Graham’s forte and his top tip, take photos of all the wires in place and the connection points before you take it apart, this way you can refer back to the photos when piecing it back together. #genius.
A quick top-up of the fluids, both for the car and for us and then the nose-cone and hood could go back on, car could come off the axel stands and a quick start up test. Nailed it! Big thank you to Graham for getting me involved and for his much appreciated patience. Can’t wait for our next blat!


