Graco Nautilus SnugLock Grow Combination Car Seat Review
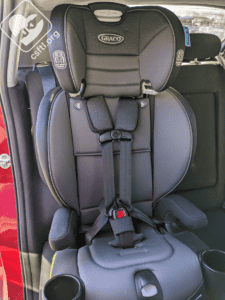
Graco Nautilus SnugLock Grow harness mode
The Graco Nautilus isn’t a new name in the car seat world, in some ways it kind of grew up along with my kids, the first ones arrived on the market right around the time my oldest kiddo began riding forward facing. She’s an adult now so it’s probably good that the Nautilus continues to evolve along with her! The latest and greatest version is the Nautilus SnugLock Grow, which has some pretty amazeballs features, including the consistently easy to use SnugLock installation and the Grow feature that gets wider as a child grows.
CSFTL Quick Stats
Forward facing harness mode
Weight range: 22-65 poundsHeight range: 27-49 inches tallSeat weight, harness mode: 22 poundsLower anchor weight limit: 45 pounds
High back booster mode
Weight range, highback booster mode: 40-100 poundsHeight range, highback booster mode: 43-57 inches tall
Backless booster mode
Weight range: 40-120 pounds (children who weigh more than 100 pounds must use backless booster mode with this seat)Height range: 43-57 inches tall
Measurements
Width at widest point: 19 inchesSeat pan depth: 13 inchesLowest harness position: 11 inchesHighest harness position: 19 inchesTop shoulder belt guide position for booster mode: 20 inchesExpiration: 10 years
Features
Grow technology — the seat adjusts to be wider as the child growsPremium lower anchor connectors11 position adjustable headrest4 position reclineHarness stores on the seat in booster modeOptional shoulder belt guide adjuster
Assembly

Graco Nautilus SnugLock Grow assembly
The seat arrives in a very tall box and requires a teeny bit of “adult assembly,” according to the manual. Obviously I’m not the target audience if they’re requiring an adult here.
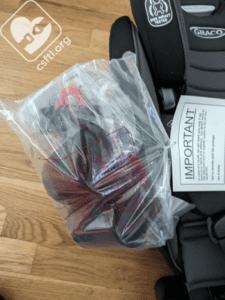
Graco Nautilus SnugLock Grow cupholder assembly
The manual instructs to install the cupholders first. Now, cupholders can be a bit problematic because caregivers tend to lose them or decide they’re not needed when (sometimes but not always so please read your car seat’s manual) they are, in fact, required. I see that Graco attempted to fight this by shipping both cupholders, the manual, and the shoulder belt guide adjuster in one handy package. Whether or not this handy package is easy to lose or not is up to caregivers, but I applaud the effort.

Graco Nautilus SnugLock Grow cupholders
Those cupholders instantly became the bane of my existence. The manual instructs to “place the tab on the cupholder into the corresponding slot on the base and rotate the cup up and into position as shown. Despite following these directions, I only got one cupholder installed well, the other one is currently taunting me from across the room. I’ll keep trying and will report back if I figure this out.
Update from later: I did not actually figure this out.
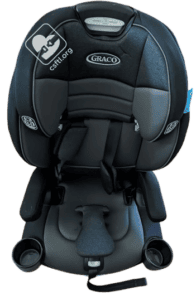
Graco Nautilus SnugLock Grow assembled
Once out of the box, the seat is quite tall and must be converted from a flat box shape into a car seat shape. Do this by moving the cover out of the gutters in the backless booster portion of the seat, then moving the seat back into the upright position. The arms holding the harness will slide into the now-empty gutters and click into place.
Manual and Quick Start Guide
Included with the seat is a handy cheat sheet for installation but the print is so small, it must be geared towards young parents or people who have magnifying glasses at the ready. Here’s a quick synopsis of what it says:
Put the top tether over the back of the vehicle seat so you don’t forget about it. This starting tip is from me, it’s not listed in the guide.
Open the SnugLock (the quick start guide says “expose” and I’ll admit that’s a little uncomfortable).
Buckle the vehicle seat belt.
Remove slack from the belt. Close the SnugLock.
Check your work by grabbing the seat at the belt path and giving it a firm handshake. If it moves less than an inch in any direction, the install is secure.
Let’s Talk about the Features
Grow — I fully expected this part of the seat to be really obvious, I’m talking mid-2000’s Diono Monterey obvious, where the side wings expanded so much it looked like the seat was growing actual wings that could fly. The Nautilus SnugLock Grow’s growing is a little less obvious but there is a bit more shoulder room as the headrest is raised.
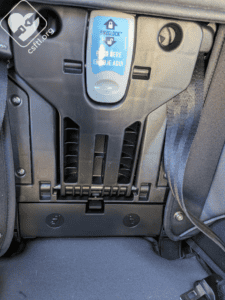
Graco Nautilus SnugLock Grow SnugLock
SnugLock — we’ve been big fans of this type of lockoff for some time. In this case, it makes a seat that, in the past, in my particular vehicle anyway, was pretty difficult to install, SnugLock makes the installation quite easy. Mom-to-young-kids me would have been SO happy to have this on our past version of the Nautilus!
Installation: Vehicle Seat Belt
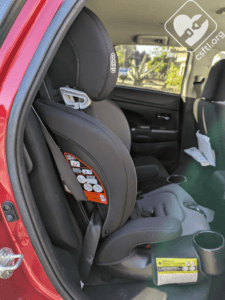
Graco Nautilus SnugLock Grow installed with the vehicle seat belt
I’m pleased to report that for the most part, the very tiny instructions in the Quick Start Guide were spot on. Here’s the longer version of my installation experience since that brevity isn’t what you came here for.
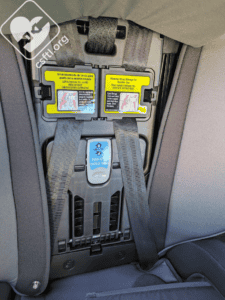
First, set the car seat on the vehicle seat with the harness facing the front of the vehicle. Then, place the top tether over the back of the seat back and attach it to the top tether anchor, leaving a lot of slack in the webbing for the final step in this process. Lift the cover to expose the SnugLock panel, press the center of the panel to open it. Thread the vehicle seat belt behind the panel and buckle the seat belt. Pull up on the shoulder portion of the seat belt to remove most (but not all) of the slack, then close the SnugLock panel. Grab the seat at the belt path and give it a firm handshake, if the seat moves less than an inch in any direction, you’re ready to ride.

Graco Nautilus SnugLock Grow harness mode
I found this process pretty painless. As with many seats that have some version of a lockoff, the trick is to have the right amount of slack in the vehicle seat belt (or lower anchors but I’m not talking about them yet) to allow the panel to close with the right amount of tension to make sure the car seat is installed securely.
Final step? Tighten that top tether that we set up in the first step.
Installation: Lower Anchors
The Nautilus SnugLock Grow’s lower anchor weight limit is 45 pounds, which means that you can use lower anchors until the child weighs 45 pounds. I’ll add my usual sidebar: you can use the vehicle seat belt at any weight. Either method is safe, provided that the seat is installed securely.
First, set the car seat on the vehicle seat with the harness facing the front of the vehicle. Then, place the top tether over the back of the seat back and attach it to the top tether anchor, leaving a lot of slack in the webbing for the final step in this process. This is where things are different than the vehicle seat belt installation — you have to remove a lower section of the panel to access the lower anchors. They’re stored in a teeny tiny compartment at the very bottom of the inside of the seat’s shell. While I’m a big fan of tidy things and storage in general, this compartment might be a hair too tiny because I had a really hard time cramming the lower anchors back into it after I was done with this part of the review. I highly suggest taking a reference picture of the exact way the webbing is folded in there BEFORE removing the lower anchors. And if you have such a picture, please send it to me.
So, once you’ve removed the lower anchor connectors from this cubby that I’ve now talked too much about, open the SnugLock panel and thread the connectors through the belt path. Connect them to the lower anchors in the vehicle. Pull the webbing from inside the seat to remove slack in the webbing, then close the SnugLock panel. Again, the real trick here is removing just enough slack to allow the panel to close while leaving just enough slack in the webbing to make the installation secure. Sounds harder than it was.
Once the seat is installed, grab the seat at the belt path and give it a firm handshake, if the seat moves less than an inch in any direction, you’re ready to ride. Secure that top tether and you’re ready to go.
Conversion to Booster Mode
Graco Nautilus SnugLock Grow converting to booster mode
The seat converts to high back and backless booster modes, though not at the same time. It’s one or the other. We’ll walk through converting to a high back booster seat first. The harness and crotch buckle store in a tiny compartment inside the seat’s shell. Lift the cover to bring this compartment into the light of day, then open one side at at time to store each side of the chest clip and buckle tongues. Pull the harness tight, it will hide behind the padding but remain on the seat. Remove and store the crotch buckle by first removing the elastic from the bottom of the back of the seat, then unsnapping the cover from the sides of the seat to expose the seat pan, and finally sliding the crotch buckle into the storage spot on the seat pan. Reattach the seat pan cover when that’s complete.
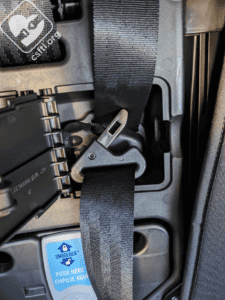
Graco Nautilus SnugLock Grow converting to booster mode
The harness pads also don’t fit in the storage cubby, try to put them somewhere you won’t forget. Once the harness is stored, adjust the recline angle position to the most upright position, then the seat is ready for use in high back booster mode.
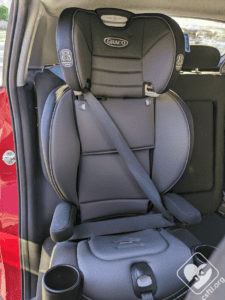
Graco Nautilus SnugLock Grow booster mode
LATCH is permitted in booster mode if the vehicle manufacturer also allows it.
Conversion to Backless Booster Mode
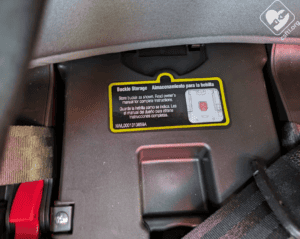
Graco Nautilus SnugLock Grow booster mode buckle storage
When your kiddo is tall enough that they no longer fit in the Nautilus SnugLock Grow in high back booster mode, the back comes off to make the seat a backless booster. The manual describes this process as if the seat is converted directly from harness mode to backless booster mode but in our experience, this conversion is a lot more common from high back to backless boosters so we’ll explain that conversion instead.

Graco Nautilus SnugLock Grow booster mode conversion
Remove the harness from the storage compartment and loosen it all the way. Remove the harness from the splitter plate. Unhook the elastic tabs from the back of the bottom of the base and from the sides to expose the seat pan. Grab the red two buttons on the bottom of the seat pan, then squeeze them and push the back of the seat away from you.
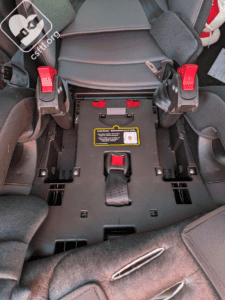
Graco Nautilus SnugLock Grow booster mode conversion
Once the seat is flat, squeeze those buttons again to separate the high back portion of the seat from the backless portion.
If the snaps over the seat pan’s cover are still unsnapped, snap them back into place now.
Fit to Child
Harness Mode
3 Year Old Doll

Graco Nautilus SnugLock Grow 3 year old doll
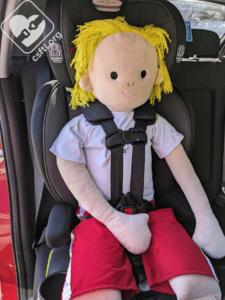
Our 3 year old Huggable Images doll is 31 inches tall and weighs next to nothing. The doll has plenty of room to grow in this seat.
Graco Nautilus SnugLock Grow 6 year old doll
6 Year Old Doll
Our 6 year old doll is 48 inches tall. The doll has about 2 clicks left in the norethread harness, meaning that it can be raised just a little bit more from this point. That’s about what we’d expect since the doll is right at the maximum height for the seat in harnessed mode. We’d also expect that most 6 year old kiddos are ready to move to a booster seat.
Graco Nautilus SnugLock Grow 6 year old doll high back booster mode
High Back Booster Mode
6 Year Old Doll
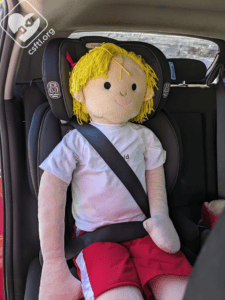
After converting the seat to high back booster mode, our doll lovingly agreed to model it for us. The doll has an excellent seat belt fit — the lap portion of the belt is across the doll’s thighs and the shoulder belt hits right in the center of the doll’s shoulder.
Backless Booster Mode
6 Year Old Doll
Graco Nautilus SnugLock Grow 6 year old doll backless booster mode
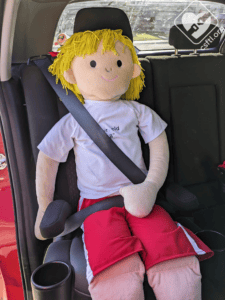
Our doll once again proves to be a clutch player in this review, stepping in to model the seat in backless booster mode. We find the same excellent belt fit that the doll enjoyed in high back booster mode.
Important Information: Where to Find
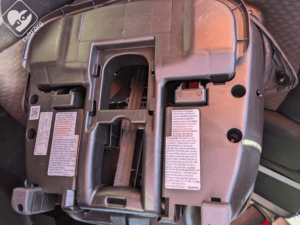
Note: all of these key labels/storage locations are on the bottom of the backless booster portion of the seat.
Graco Nautilus SnugLock date of manufacture label
Date of Manufacture label — the seat expires 10 years after the date of manufacture. This label is with a cluster of other labels on the bottom of the seat.
FAA approval — the seat is approved for use in aircraft when it’s in harness mode. The approval label is found on the bottom of the seat.
Manual storage — the manual stores in a little cubby on the bottom of the backless booster portion of the seat.
Overall Thoughts
Today’s modern Nautilus has a lot more to offer than my mid-2000’s model did. SnugLock makes pretty much everything better, that’s no exception here. The seat installs with no fuss or muss, fits our models well, and is a solid addition to Graco’s already solid lineup of car seats and booster seats.
