2022 Britax Boulevard ClickTight Convertible Review: Sometimes Things Just Click

![]()
![]()
![]()
![]()
![]()
Britax Boulevard ClickTight Car Seat Review
Car seats have come a long way in the past decade, and it seems like every manufacturer has some special feature to sell you their product. It’s easy to get overwhelmed when you’re trying to sort through the barrage of marketing ads and videos. We get it and we’re here to help. With over 100 reviews and 20+ years of experience in the field, we will help you understand the pros and cons of almost any car seat that you might be considering.
You might be wondering if ClickTight is just some marketing gimmick or if it actually lives up to the hype? I’m happy to report that the Britax Boulevard ClickTight is a game-changer in the carseat world. Every now and then, something comes along that is truly groundbreaking – something that fundamentally changes the stakes. The Britax Boulevard CT is all that and more which is why it’s an Editors’ Pick on our list of Recommended Convertible Carseats.

Before we dive into all the details, here’s a quick overview of the differences between the three ClickTight convertibles, the Marathon CT, Boulevard CT, and Advocate CT. All Britax CT convertibles have the ClickTight Installation System, an impact-absorbing base with 7 recline positions, rip-stitch energy-absorbing tether, HUGS harness pads, a steel-reinforced frame, EPP energy-absorbing foam, and other side-impact protection features.
Each Boulevard ClickTight model comes with an easy-to-remove cover, EZ-Buckle System (keeps buckles and straps out of your way when placing your child in the seat), optional infant body insert for newborns, optional harness strap covers and energy-absorbing rubber HUGS pads.
2022 Boulevard CT Fashions


Boulevard CT Specs:
Rear-facing 5-40 lbs.
Outgrowing this seat in the rear-facing position by height won’t be an issue because it’s so tall that all kids (even the really tall, really skinny kids) will fit height-wise if they are still under 40 lbs. Children can rear-face until their heads are 1″ below the adjuster on the headrest, which can be fully extended.
Forward-facing 20-65 lbs., 49″ or less, at least 1 year old (Britax recommends that children ride rear-facing to the highest weight or height specified)
LATCH limits: 35 lbs. rear-facing, 40 lbs. forward-facing (child weight only)
FAA approved for use on aircraft
10 yr lifespan before seat expires
Made in the USA!
Boulevard CT Features:
ClickTight installation system (also acts as a built-in lockoff device)
Side Impact Protection – deep protective shell and energy-absorbing headrest
14-position headrest with no-rethread harness
2 crotch strap/buckle positions
EZ-Buckle System keeps buckles and straps out of your way when loading and unloading child
Steel reinforced frame
Impact-absorbing base – these cells compress in a crash
Energy-absorbing, rip-stitch Versa-Tether®
Energy-absorbing EPP foam that lines the headwings
7 recline positions to help achieve a proper recline angle in any vehicle
Smooth bottom base with grippy edges that won’t damage vehicle upholstery


Measurements:
Harness height range: 6.5″ (lowest setting) to 18.5″ (tallest setting)
Crotch strap positions: 4″, 6″
Seat pan depth (leg room/thigh support): 12″
Overall internal height with headwings fully raised: 28.5″ (to the bottom of the red adjuster)
Rear-facing seated height limit: 27.5″ (one inch below red adjuster)
External width at widest point (torso wings): 18″
External width at front of seat: 17″
Widest point of base: 14″ (base is a rounded, tapered square, so the very front and back are a bit narrower)
Internal seat width in bum area: 10″
Internal seat width at shoulders: 11″
Weight: 28 lbs. (according to my scale)
Installation Comments:
Seatbelt Installation
The great news is that this seat practically installs itself, both rear-facing or forward-facing, if you’re using the ClickTight system with the seatbelt in your vehicle. Really, it’s super-duper easy to get a nice tight install each and every time thanks to the ingenious ClickTight System.
That said, I’m not going to call it fool-proof. When I first got the seat, I took it out of the box, stuck it in our car, opened the ClickTight panel, and told my husband to install it. He routed the seatbelt through the correct beltpath slots, but only the lap belt portion of the seatbelt. Then he immediately locked the shoulder belt at the retractor. Good instincts, but not correct for a ClickTight convertible seat. So the lesson is: Read the manual, or at the very least, watch a video or two from a reliable source.
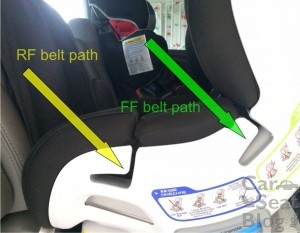
Once you realize what you’re supposed to do, though, installation really is a breeze with the seatbelt. You simply open the panel by pushing in on the dimple on top of the ClickTight logo, then turn the knob like a key. Then you route both portions of the lap-shoulder belt through the appropriate forward- or rear-facing belt guides, remove any excess slack, and push the ClickTight panel closed. Then you check for tightness, and it will likely be rock-solid, although up to an inch of movement is okay.
Our video below walks you through it, step-by-step.
There are a few things to keep in mind. Sometimes you can remove too much slack from the belt, which can make the ClickTight panel hard to close. In that case, just loosen the belt a little bit and try again. Conversely, if the seat is too loose, open the panel and pull out a little more slack and try again. It’s also important to make sure you’ve taken the slack out of both portions of the seatbelt. The belt slots in the ClickTight panel are narrow and padded by the cover, so it’s easy for the seatbelt to get hung up if you’re not paying attention.
Another issue I noticed is that when rear-facing, the angle will wind up more upright after closing the ClickTight panel. This makes sense, because you’re pushing down in the foot area of the seat, bringing the seat more upright. You can remedy this by also pushing down at the top of the seat while closing the panel (though the angle still might shift a bit) or by starting with the seat more reclined than you want, to compensate for the incline you’ll gain while installing. As always, make sure you check the angle after it’s installed to make sure it’s where you want it.
*Tip – the ClickTight panel won’t open when there’s a lot of pressure on it, so to uninstall the seat, you’ll want to unbuckle the seatbelt first, and then open the CT panel.
A final word of caution: When installing rear-facing, make sure you keep the harness adjuster strap out of the way of the ClickTight door! Ask me how I know.
LATCH Installation
This is where things get a little tricky.
I suspect that if Britax could have made this seat without LATCH, they would have. Installation with the seatbelt is just so easy, plus the federal LATCH regulations have people confused and frustrated. But federal regulations say the seat has to have LATCH, so it does. However, LATCH installation (or more accurately, uninstallation) might discourage anyone from actually using it. I’ll explain that in a moment, but first, an overview of the LATCH system on the ClickTight convertibles.
One of the usual selling points of Britax seats are the premium, push-on-style LATCH connectors. However, the ClickTight convertibles, have standard hook-type connectors instead. The LATCH strap is stored in a little compartment on the back of the seat. It’s well labeled and efficient. (It’s also most easily reached when the seat is upright.)

To use the LATCH belt, you remove it from its storage cubby, open the ClickTight panel, and route the strap to the child’s left side and through the appropriate belt slots in the seat. Connect the hooks to your lower LATCH anchors, then remove excess slack and close the ClickTight panel. Pretty straight-forward.
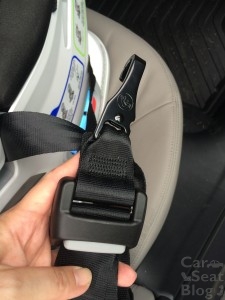 When it comes time to uninstall, though, you might be in for a challenge. With push-on LATCH connectors, you can just push a red release button and the connectors will pop off the anchors. But with the hook connectors, you need to loosen the LATCH strap in order to unhook them. The Boulevard LATCH strap has the kind of release mechanism where you need to push a grey button while simultaneously pulling on the webbing to loosen it. However, when the strap is very tight, this is difficult to do. And the strap likely will be very tight because of the way the ClickTight panel clamps down on it. Lastly, because the ClickTight panel won’t open when it’s holding a belt tight, you can’t go that route, either.
With one install (rear-facing), I was able to shove the seat enough to one side that I could get just enough leverage to loosen the LATCH strap, then unhook the connectors and open the panel. My next installation (forward-facing) was another matter. Despite my best efforts, I could not get the strap to loosen, even when I sat in the seat. I also couldn’t get the ClickTight panel to open, which didn’t surprise me, but I figured was worth a try. My last option was to go get my husband, who had just settled in for a nap.
My husband is a strong guy–former firefighter and all that. He couldn’t get the adjuster to budge and was convinced it was broken, even though I kept assuring him that’s just how it is. I sat in the seat. He sat in the seat. It. Would. Not. Loosen.
Finally, he was able to get the ClickTight panel open. (I did check the LATCH release button after that to make sure it was, indeed, functional, and found that it was just fine.)
We asked Britax about this, and they said they were aware that this could be an issue with LATCH installations, but given how easy the seatbelt installation is, there’s really no reason to use LATCH. Plus, seatbelts are available in every seating position, whereas LATCH is typically limited, plus LATCH has those pesky weight limits.
In a way, they have a point. Why bother taking out the LATCH strap and routing it, connecting it, etc., when you can just use the seatbelt? But there are times a person may want or need to use LATCH. One compelling reason might be in situations where you have a child in a booster seat next to the installed convertible. In situations where the two seatbelt buckles are right next to each other, sometimes the kid in the booster unlatches the wrong seatbelt. And when they accidentally do that, they often forget to tell you. Plus, some people are still under the assumption that LATCH is safer or “better” than a seatbelt (it’s not).
Besides that, though, the seat installed nicely with LATCH in both my vehicles, rear- and forward-facing.


Lower LATCH Anchor Weight Limits
Rear-facing the lower LATCH anchor weight limit is 35 lbs. Once your child reaches 35 lbs. you MUST install with seatbelt.
Forward-facing the lower LATCH anchor weight limit is 40 lbs. Once your child reaches 40 lbs. you MUST install with seatbelt and tether*.
Tether
Remember to attach the tether strap to the tether anchor in your vehicle if the carseat is installed forward-facing, whether with LATCH or a seatbelt. Many parents think the tether anchor is only for installations with lower anchors, but that’s not true. A tether reduces head excursion in a crash, so you always want to use the tether if the seating position if your vehicle has one. Not sure if you do or where it’s located? Check your vehicle’s owners manual! If your vehicle was made anytime during the last 20 years, you should have top tether anchors, but they are not always in obvious places, and not always in every seating position. Find them! Use them! Shower them with love and attention!
On the CT seats, the tether is stored in a nice compartment at the back of the seat. The tether comes wrapped up and stored under two plastic hooks.


The anti-rebound bar is available separately as an accessory if you already own a model that didn’t come with one. The ARB can be used rear-facing with any Britax ClickTight Convertible (Marathon, Boulevard or Advocate). The ARB is not required but it’s a nice safety feature to have.

Headrest Interference/Overhang – Sometimes a vehicle headrest will interfere with a forward-facing installation. Britax says that if a vehicle headrest interferes with your ability to raise the carseat’s headrest to the correct position, the vehicle’s headrest should be removed or raised, if possible. If not, you’ll need to use a different seating position. Removing the headrest wasn’t an issue in my 2014 Civic (photo below, on left). The shell of the seat nestled perfectly under the headrest, and while the Boulevard’s headrest lightly grazed the vehicle’s head restraint, they didn’t push on or interfere with each other. In my Odyssey, though, I did need to remove the restraint in the captain’s chair because it pushed on the Boulevard CT’s headrest (below, right).
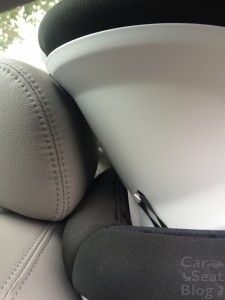
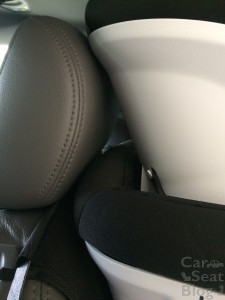
Recline Positions – It should also be noted that Britax specifies that forward-facing seats cannot hang off the front of the vehicle seat by more than 3 inches. I didn’t have any overhang in my installations, but if this is a problem for you, try putting the seat in a more upright position, removing the vehicle headrest, or try another seating position.
The Blvd CT offers a wide range of recline angles, and these options create more potential for finding a suitable recline angle and taking up less space in the vehicle. Children under 6 months old generally need more recline, but as they grow and gain good head and neck control, the seat can be installed more  upright. The recline angle indicator on these new models is excellent and pretty self-explanatory. For rear-facing, the angle indicator should be in the light blue zone for younger babies and can be in the dark blue zone for older babies, toddlers, and older kids who still ride rear-facing. When the seat is installed forward-facing, the angle indicator should be somewhere in the green zone.
When I set it on the seat of my Honda 2010 Odyssey, without installing it, the recline indicator was on the “baby” side of the RF angle range. However, once installed, the recline wound up about midway on the rear-facing spectrum.
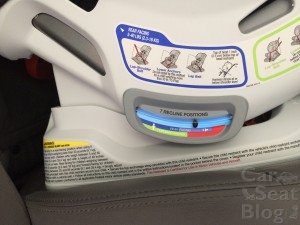
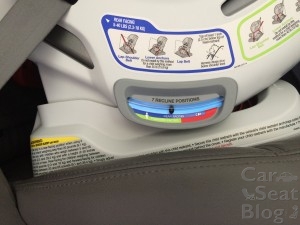
I decided to try some “tricks.” I intentionally introduced a little extra slack into the seatbelt. Then I greatly over-reclined the Boulevard, lifting the front of the base off the vehicle seat. Finally, I pushed down on the back of the seat while closing the ClickTight panel. Doing that resulted in a rock-solid install with the base flat on the seat, and the recline indicator showing almost maximum acceptable recline. It was very easy for me to do as a tech, but a typical parent likely wouldn’t think to do that. When I put the seat in my Civic using the “tricks” I outlined above, I was able to get it more reclined without needing noodles:
In some vehicles or seating positions a piece of foam pool noodle or rolled up towel might be necessary to achieve a suitable recline angle for a newborn or young baby. The current generation Dodge Grand Caravan (pictured) and the similar Chrysler Town & Country are a good example of when you might need a little extra help to get an acceptable recline for a baby who doesn’t have good head or neck control yet. The steeply sloped seats in these vehicles are known for being problematic with RF carseats.

Another issue is that when fully reclined, the seat does take up more front-to-back space. The amount of room it takes up fully reclined will vary from vehicle to vehicle but if you’re planning to use the seat from birth – the best advice, as always, is to try before you buy. The seat takes up considerably less room when installed more upright, as it can be for older babies, toddlers and preschoolers.
How upright can it be for older rear-facing kids? If you have an older rear-facing child who really doesn’t need any recline at all (they would be okay, angle-wise, seated upright in the forward-facing position), you can put the seat as upright as you’d like. The ClickTight models take up very little space rear-facing if installed in a very upright position. In reality, most parents probably won’t install the CT models this upright rear-facing, but we asked Britax for clarification and we all agreed that there is no such thing as “too upright” for older RF kids who don’t have any special healthcare needs. If your older kid is comfortable sitting rear-facing at 25 degrees from vertical, Britax has no issue with that.mid-range position, I had the passenger seat in exactly the same place I usually do.

Fit-to-Child
Below are pics with a 20″ newborn-sized doll. This doll is roughly the size of a newborn weighing 8 or 9 lbs. Harness fit even without the newborn insert pillow that comes with the seat was excellent in this case. You may need to use the lower body insert for a smaller newborn if the baby’s shoulders are still below the harness slots in their lowest height setting. I removed the optional harness strap covers in these pictures and in real life I might also suggest removing the rubber HUGS pads. The HUGS pads are mandatory for forward-facing but are optional for rear-facing. The insert pillow (if used) should be removed once the child fits comfortably and properly without it. Note: when the headrest is in the lowest position the excess cover/fabric should be folded and goes under the baby (or under the insert), as pictured below.
Newborn doll without infant insert (one position above lowest height setting):


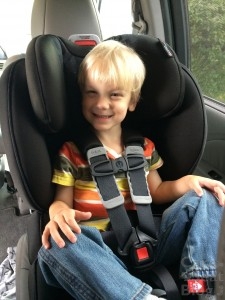
This is my youngest son who just turned 3 a couple weeks ago. He’s about 37″ and weighs 30 lbs., so he’s on the smaller side. He fit great with tons of room to spare. Best of all, he really likes the seat (every time I open the door to the van, he exclaims, “My new seat!” like he expects it will have disappeared).
Of course, I wanted to see how my 37 lbs., 5-year-old fits. She’s been forward-facing for more than a year now, but she could easily rear-face in this seat.
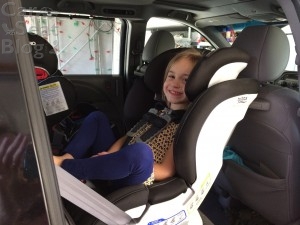
The photo below shows how much room she has left before outgrowing the seat. (The straps are above her shoulders here, which is incorrect for rear-facing. I just wanted to demonstrate all the room above her head.) She would be able to rear-face until her head was an inch below the red adjuster, or until she reached 40 lbs, whichever came first.

With older rear-facing kids, people are often concerned about leg room. My daughter did say she felt cramped in the seat, and she didn’t feel much (if any) difference when the seat was very upright or more reclined. Honestly, though, that’s not surprising for a 5-year-old, especially one who has ridden forward-facing for a year and a half, and therefore isn’t used to riding with her legs positioned like that anymore.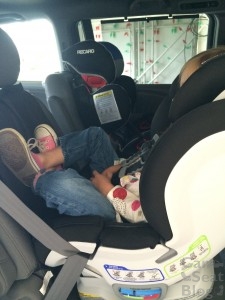
On the other hand, my 3-year-old hasn’t complained once.

Forward-facing, my daughter fit great. She said it was very comfortable and liked it a lot (especially liked the shoulder pads). It offered good leg support, and since there are so many acceptable angles, it would have been easy to install it more reclined or more upright if it had been necessary/desired.





She also has a lot of room before she outgrows the Boulevard CT forward-facing. These photos show how much room she has over her head and how long she has until her shoulders reach the top harness position. (For reference, she wears a size 5 shirt.)


There are two positions for the crotch strap. For forward-facing children, you must use the outer position. For rear-facing, you can use either, but the strap shouldn’t be under the child. Both of my kiddos needed the outer position. The strap can be moved with the seat installed: Simply raise the ClickTight panel, turn the strap a bit, and run it along the slot forward or backward to the desired position.
Ease of Use
Being able to raise or lower the harness height while the seat is installed is a big plus, and the Boulevard allows for an easy, smooth adjustment. The recline mechanism is extremely smooth and easy—much easier than on some other seats. Simply pull the lever and gently guide the seat forward or backward as necessary.
I absolutely loved the EZ-Buckle Pad feature. It holds the crotch strap and buckle out of the way beautifully so you never need to dig around for it under your child. The space created for the rear- and forward-facing belt paths can also be used to hold the harness straps out of the way so you don’t need to dig for those either. I always forget to use them, though!


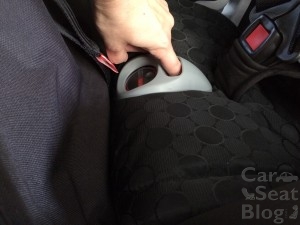
The chest clip and buckle are both easy to buckle and release. And the harness release button is easy to reach.
Cover/Maintenance:
I’m always afraid of taking off covers (and more afraid of putting them back on), but the Boulevard CT proved easier than I expected. The cover comes off in four pieces, and the manual does a great job of outlining the steps. There’s just a little bit of velcro and a few elastic tabs, but mostly the cover is held in place by sticking the well-contoured fabric into grooves within the seat. The most important thing to remember is that you must ensure the cover goes behind the red tabs on the front of the ClickTight compartment to avoid interfering with the mechanism. Luckily there’s a sticker there to remind you.


The cover can be hand washed and line dried.
FAA-Approval/Lifespan/Crash Guidelines/Inflatable Belts:
The ClickTight convertibles are approved for airline use. To use the seats on a plane, you bypass the ClickTight feature, and simply route the plane’s seatbelt through the rear- or forward-facing belt path OVER the closed ClickTight panel. Note that bypassing the ClickTight panel is for airline installations only.
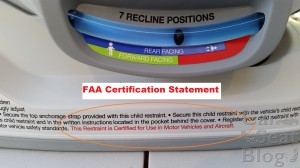
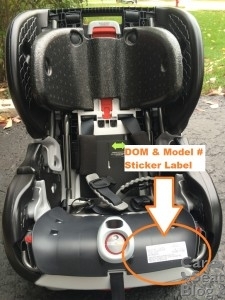
The Boulevard CT has a 10-year lifespan and a one-year limited warranty. The manufacture date and model number sticker can be found on top of the ClickTight panel when you peel back the cover over that section.
Britax follows NHTSA’s guidelines for replacement after a crash.
Britax does not allow the use of inflatable seatbelts with its ClickTight seats.
Accessories:
Britax cup holder, vehicle seat protector mat, protective travel bags and anti-rebound bar are available as accessories (for purchase separately).


Boulevard CT Advantages
Generous height and weight limits for rear-facing and forward-facing
Super easy seatbelt installation with ClickTight System
ClickTight also acts as a built-in lockoff device so you don’t need to understand the locking features of your vehicle seatbelt
No-rethread harness makes it easy to adjust the harness height when your child has a growth spurt
Harness straps are thick and not prone to twisting
EZ-Buckle System keeps belly pad and buckle out of the way when loading child in the seat
IMMI buckle is easy to buckle and unbuckle
Deep headwings provide enhanced protection in side-impact crashes
Durable EPP foam, rip-stitch tether, HUGS pads and impact-absorbing technology in base all work together to absorb energy in a crash
Harness straps are replaceable, if necessary
HUGS pads may be removed when the child is rear-facing (but they are required for forward-facing)
Range of rear-facing recline angles allowed
Doesn’t take up a lot of room rear-facing if installed more upright for an older baby or toddler. This makes it a good option for smaller cars or for tall parents.
Easy to remove cover
Premium fabrics and extra padding for comfort
Made in the USA!
Disadvantages
(In all fairness, these aren’t necessarily problems but I list them here to inform potential consumers of specific Blvd CT issues)
LATCH un-installation can be a real challenge
Heavy and bulky
Limited rear-facing leg room for older children near the upper limits of the seat
Newborn recline angle may be difficult to achieve in some vehicles without a pool noodle
Conclusion
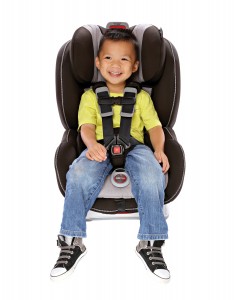 So, did the Britax Boulevard ClickTight live up to the hype? My opinion, YES. The seats have taken almost all of the difficulty and frustration out of installing a child restraint with a seatbelt. That’s a huge advance toward eliminating misuse. The seat isn’t completely foolproof, but it’s closer than anything else on the market. Add to that a super-tall shell for rear-facing, plus extra goodies like the versa-tether and optional ARB and this seat is hard to beat.
For additional information on the Britax ClickTight convertibles please visit the Britax website: https://us.britax.com/car-seats/boulevard-clicktight.
Thank you, Britax for providing a Britax Boulevard CT for our review. No other compensation was provided and all opinions expressed in this review are those of CarseatBlog.
CarseatBlog Experts Rating
Editors’ Pick Premium Category: Boulevard ClickTight
Also Recommended: Advocate ClickTight, Marathon ClickTight

