Joie Rue Rear Facing Only Car Seat Review
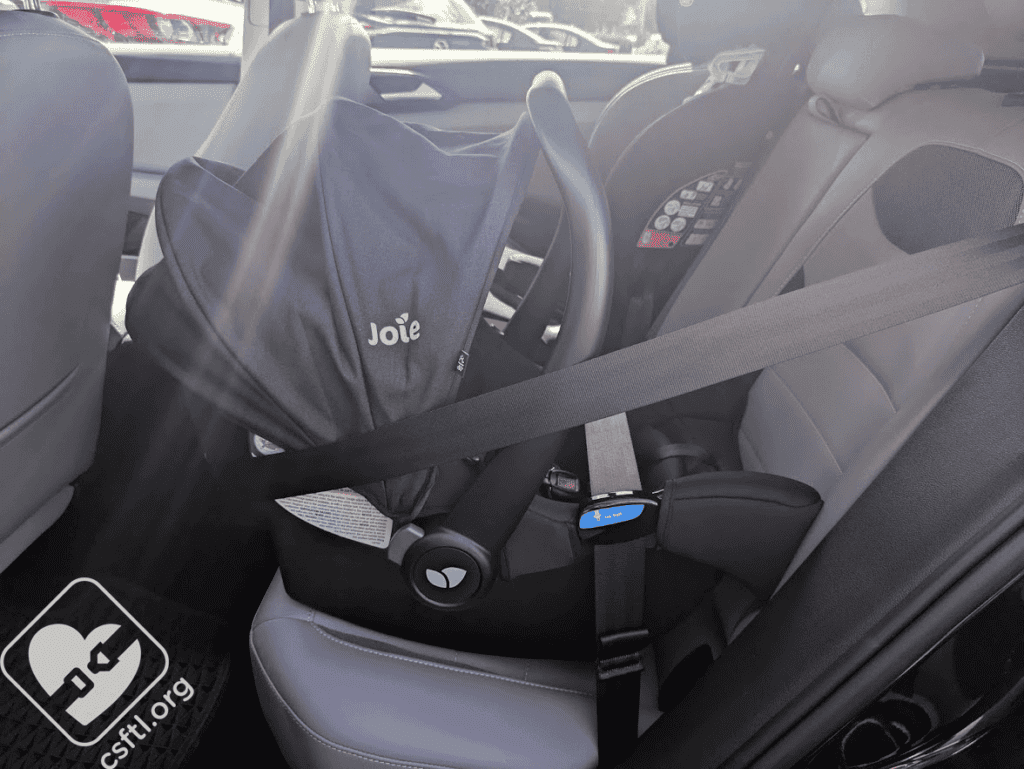
Joie Rue
In a world of increasingly priced rear facing only car seats, we’re pretty excited to see a small trend back towards more budget-friendly seats. The Joie Rue joins that illustrious and growing group. The first Joie seat we spent any real time with is the mint latch baseless carrier. We liked that seat quite a bit so we’re eager to see how the budget-friendly Rue matches up. It’s definitely a bit different so please come along as we explore the Rue.
CSFTL Quick Stats
Rear facing weight range: 4-30 poundsRear facing height range: under 30 inches and The top of child’s head MUST be at least 1 in. (2.5 cm) below
the top of the child restraint.Replace after a moderate or severe crash (follows NHTSA guidelines)Expiration: 7 years after purchase dateFAA approved for use on aircraft
Measurements
2 crotch buckle slotsCarrier weight: 7.8 poundsCar seat size: l 25.75 x w 17.5 x h 22.5 in.Base size: l 24 x w 12.5 x h15 in.Car seat weight: 7.8 poundsBase weight: 8.7 pounds
Features
Clearly marked labelsBudget-friendly pricingPremium lower anchorsManual rethread harnessEuro routing for baseless installationLockoff on the base3 piece inserts — body insert can be used until the child weighs 11 poundsAnti-rebound barUPF 50+ canopy4 harness slots
Head Support and Infant Insert
The Rue includes a head support and a body support. There are no weight restrictions on the head support, but the infant insert must be removed when the child weighs 11 pounds. Like the mint latch baseless rear facing only car seat (also by Joie), the hardest part about using the seat was getting that head support reattached to the seat once I took it off.
The infant insert has snaps on the side to keep it in place. That’s a small touch that makes a big difference in the day-to-day use of a seat and we applaud Joie for it! The infant insert also contains a tiny present — what Joie describes as a newborn pillow. This little cushion is tucked inside of the body insert. It has no labels to indicate what it is and it kind of looks like a maxi pad. Once I figured out how to remove it from the body cushion, I tried the fit on our newborn and preemie dolls.
Recline Angle Adjuster
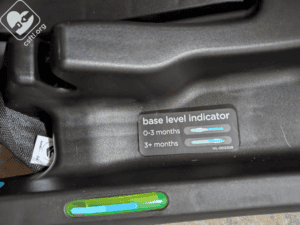
Joie Rue recline angle indicator
The Rue has two different recline positions, one for babies who are less than 3 months old and another for babies who are older than 3 months. For the 0-3 month old crowd, make sure the bubble is entirely under the light blue line. For the 3+ month old group, make sure the bubble is entirely under any portion of the line.
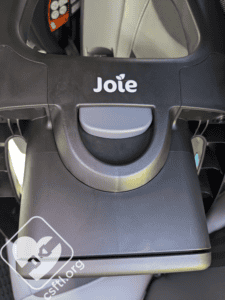
Joie Rue recline angle adjuster not extended
The adjuster itself allows for a very large range of angles. It extends from being pretty darn small to being pretty darn huge so we’d expect that the Rue will fit well in a wide variety of vehicles without the need for a rolled towel or a pool noodle to adjust the recline angle.
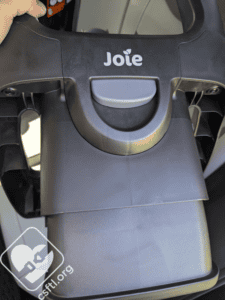
Joie Rue recline angle adjuster fully extended
This may sound like something small, but we’ve seem many a rear facing only car seat base not provide the right recline angle when the vehicle seat is sloped so having this problem solved in advance means the Rue will probably work just about anywhere.
Handle Rules
The carry handle has 3 locked positions and 1 convenience position.
Carry – Use this position for carrying the carrier and installing it in your vehicle.Convenience – Use this position when removing your child from the child restraint. This position does not lock. Travel – Can be used when installing in your vehicle.Stand – Use this position to stop the carrier from rocking.
The manual recommends having the handle in the carry position when in the vehicle but doesn’t have any definitive restrictions around handle use.
Crotch Buckle Rules
The Rue has For safety and comfort, the crotch buckle can be adjusted when it is underneath your child and no longer in front of them.
Labels
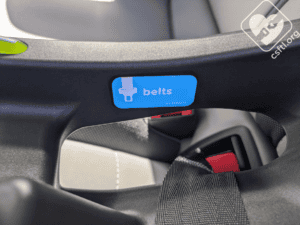
Joie Rue lap belt label
The Rue has some very clear labels that make just about everything easier. This kind of small touch makes a big difference.
Installation
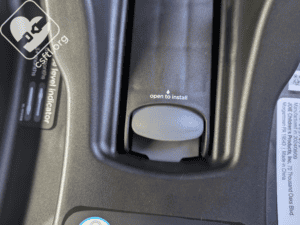
Joie Rue lift the lockoff label
The manual includes a chart for installation types — lower anchors, lap belt only or lap/shoulder belt are all permitted for the entire use of the seat. Though we’d expect that since the seat’s maximum weight is 30 pounds, it’s still kinda awesome to have it all spelled out like this. For so many families, the rear facing only car seat is their first introduction to car seats, we welcome anything that makes it easier for caregivers to install and use a seat correctly!
Installation: Lower Anchors
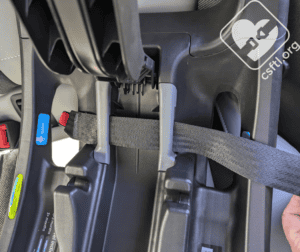
Joie Rue lower anchors
The Rue has push button lower anchors. They’re threaded through two attachment points on the base so it’s pretty much impossible to thread them through the wrong spot. We applaud everything that makes using a car seat correctly easier, so we’re definitely fans of this small but important feature!
Lower Anchor Storage
The lower anchors clip in to cubby holes on either side of the seat. To install with the lower anchors, press the red button on each connector and remove it from the storage spot. Thread the webbing under the lockoff and through the belt path. Attach each connector to the lower anchors in the vehicle, then pull the webbing fairly snug. Leave a little bit of slack for the lockoff, then close the lockoff. Check for movement at the belt path — if the base moves less than an inch, you’re ready to ride.
Vehicle Seat Belt

Joie Rue
Before installing the base with the vehicle seat belt, store those lower anchor connectors. Then set the base on the vehicle seat and open the lockoff. Thread the vehicle seat belt through the belt path and buckle. Pull on the shoulder portion of the belt to remove slack from the lap portion of the belt, then close the lockoff.
Without the Base
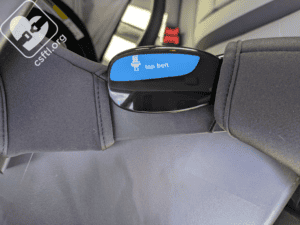
Rue belt path
The Rue includes optional Euro routing for baseless installations. The belt guides are clearly marked and the belt guide on the back is clearly marked, too.
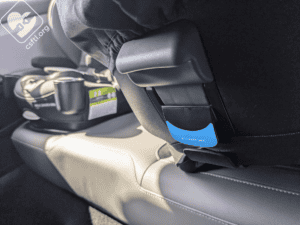
Rue belt guide for Euro routing
That all added up to a pretty painless baseless installation.
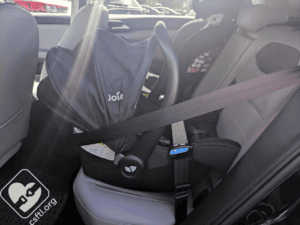
Joie Rue installed without the base using Euro routing

Joie Rue installed without the base
The Rue can also be installed with the more traditional lap-only method for a baseless installation. Thanks to those clearly-marked belt guides, this was also pretty easy.
Getting the Kiddo Situated in the Carrier
Normally this doesn’t get its own section but I learned some things while working with the Rue and I wanted to share them with you. The carrier is kind of a C-shape, rather than an L-shape. This means that the section underneath the kiddo’s rear end is kind of rounded rather than, well, shaped like an L. Adding the body padding into the seat along with that newborn insert that’s tucked inside when the seat arrives makes that curviness even more curved, all of this led to a bit of a learning curve around getting my dolls into the carrier correctly.
If I lined the doll’s bottom up with the spot where I thought the Rue’s carrier would curve, the doll ended up below the bottom harness slots. I had to scoot the doll up a bit to get those harness straps at or below their shoulders. Once I figured that out, the dolls fit well in the seat. I also tried every combination of body cushion and newborn insert to see what worked well for each doll.
Fit to Child
Preemie Doll
With Inserts
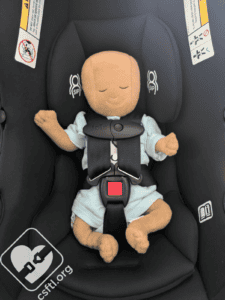
Joie Rue preemie doll with inserts
Our preemie Huggable Images doll weighs 4 pounds and is 17 inches long. The Rue doesn’t have a minimum height so our doll could use the seat. With the inserts (and newborn cushion) in place, we found that getting the doll into the right spot for a proper fit took some doing. My instinct was to slide the baby’s bottom down to the lowest possible point, then adjust the harness. But doing that placed the harness straps just above the doll’s shoulders. After some experimentation, I discovered that moving the doll up a bit from that lowest possible position put the doll in the right place for the harness straps to be below the shoulders. The harness then fit our doll well.
With Inserts but Without Newborn Cushion
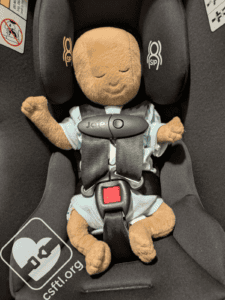
Joie Rue preemie doll with body cushion without newborn cushion
Once I removed the newborn cushion, the preemie doll had a better fit, BUT the harness was actually not short enough to fit the doll properly. The slack in our doll’s shoulders is kind of hard to see here but it was definitely there! We’d continue to encourage caregivers to check the fit using the various inserts to see what fits their child best.
Without Inserts
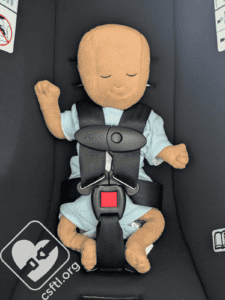
Joie Rue preemie doll without inserts
Here’s our preemie doll without those inserts in place. Since our doll is below the 11 pound weight limit for the inserts, we can either use them for this doll, or remove them. I feel like this setup was the best for our preemie.
Newborn Doll
With Inserts
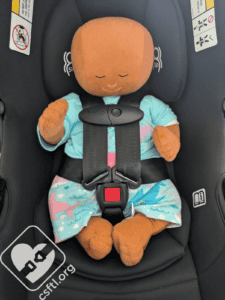
Joie Rue newborn doll with inserts
Our newborn doll weighs 7 pounds and is 17 inches long. Since this doll also weighs less than the 11 pound maximum weight for the inserts, we tried the fit with and without them and also without the newborn cushion.
With Inserts but Without Newborn Cushion
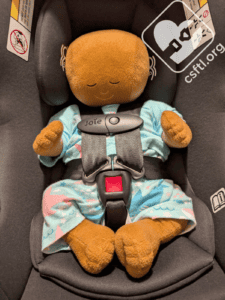
Joie Rue Newborn Doll with Inserts but without newborn cushion
Here, we’ve removed the newborn cushion but left the bigger, more plush body cushion in. The doll fits pretty well with this setup, the harness is just below the shoulders and is snug over the doll’s body.
Without Inserts

Joie Rue newborn doll without inserts
Here we have no inserts. In almost all cases, I feel like our newborn doll (which does not breathe) seems to breathe easier when the inserts are removed. That was the case here as well, though both options provided a good harness fit.
Important Information Locations

Joie Rue date of manufacture label
Date of manufacture label: the Rue expires 7 years from the date of purchase. This restriction has its own label on the bottom of the carrier, the date of manufacture label is also on the bottom of the carrier. There’s another label on the bottom of the base.

Joie Rue manual storage on the carrier
Manual storage: on the carrier, the manual stores underneath the padding on the child’s left side.

Joie Rue manual storage on the base
On the base, the manual stores in a little cubby on the bottom of the base. Please note that the manual refers to these spots as “instruction storage” so a search for “manual storage” will bring up empty results.
FAA approval label: the Rue is approved for use on aircraft when installed without the base.
Overall Thoughts
In a virtual store shelf that’s full of rear facing only car seats with increasingly high price tags, the Rue (and, so far, all of the Joie car seats we’ve met!) bring a breath of fresh, reasonably-priced air to the mix. The Rue does the most important thing well — it installs well without much fuss, it’s not encumbured by many rules, the clear labels and fixed-location lower anchor webbing take so much of the guesswork out of completing this task. The carrier itself is lightweight, once caregivers get the hang of placing the kiddo in that slightly-higher-than-I-expected position before tightening the harness, the seat is set up to fit children well.

