Evenflo NurtureMax Rear Facing Only Car Seat Review

(Last Updated On: July 11, 2022)
Evenflo NurtureMax
I’ll start this review by saying that the word NurtureMax is oddly challenging to spell correctly when writing it over and over again. Over the course of this review, I’ve misspelled it about 45 times but thanks to the miracle of spellcheck, I think all is well in the end!
This budget-friendly seat is the entry point into the Evenflo lineup. I’ve seen this model on sale for prices as low as $37 (retail is $59.98), that’s hard to beat in a world of $500+ rear facing only car seats. Let’s see how this refresh of a classic basic seat (the Nurture) stacks up.
CSFTL Quick Stats
Rear facing weight range: 4-22 pounds
Rear facing height range: 17 to 29 inches tall and the top of the child’s head is at least 1 inch below the top of the child restraint seat back
Expiration: 6 years. This information is found on the labels on the seat but not in the manual.Approved for use on aircraftReplacement guidelines: replace after any crash
Measurements
Carrier weight: 6.2 poundsHighest harness height: 10 inchesLowest harness height: 5 inchesWidth at widest point: 17 inchesFront to back space: 28 inches (this is a fairly unofficial measurement, it will vary once the seat is installed in a vehicle)
Assembly Required
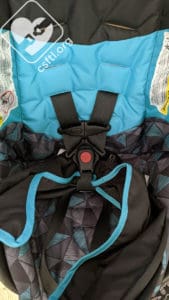
Evenflo NurtureMax canopy assembly
The NurtureMax ships with the canopy unattached. This is another kind of unique thing about the seat — I couldn’t figure out why the manual had instructions for adding it until I opened the box and saw that it’s not attached to the seat.
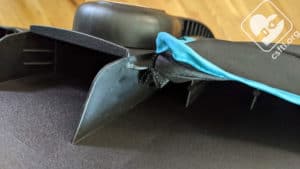
Evenflo NurtureMax canopy attached
The sides slip into pieces on the carrier while the fabric tabs slip into the slots on the edges of the handle.
Unique Rules
Handle must be locked in position 1 (most upright) when lifting the carrier
Handle must be locked in position 1 or 3 when traveling in a vehicle
IMPORTANT: Plungers must be visible through windows to ensure that seat is securely installed. More about this in the Putting the Carrier into the Base section.
When the NurtureMax is installed behind a front vehicle seat, there must be at least 1.5 inches of space between any part of the
child restraint and the vehicle seat closest to the child’s head. (This rule does not apply when the seat is installed in the center vehicle seat).
Max Weight: 22 Pounds
Back in the day, most rear facing only car seats had a 22 pound weight limit. This weight limit is sufficient to use the rear facing only car seat for the child’s first 6-9 months of life, long enough for the kiddo to grow heavy enough that many familes stop using the carrier anyway. Today’s market seems to like rear facing only car seats with a higher max weight of 32 or 35 pounds but the reality is, the average child who weighs that much is closer to 3 years old and would have outgrown such a seat by height already. So a 22 pound weight limit just adds to the value that the NurtureMax offers — you’re not paying for a higher weight limit that you’re unlikely to use.
Adjustable Waist Straps
The NurtureMax has two positions for the waist straps. The seat ships with the straps in the most likely position for an average-sized newborn. It’s unlikely that most caregivers will need to adjust these straps but jist in case, here are the guidelines around their use:
Approximate Child Size Suggested Waist Strap Positioning
Small: 4 – 6 pounds, inner slot
Medium/Large: 6 – 22 pounds, outer slot
Other Unique Things About the NurtureMax
Lightweight Carrier
The carrier weighs just 6.2 pounds.
Puzzle Buckle

Evenflo NurtureMax puzzle buckle
The carrier’s crotch buckle is a puzzle buckle. There’s a small learning curve that goes with using this type of buckle but once I got used to it, using it was fine. Line both sides of the buckle up, then insert them into the buckle as one piece.
Handle Adjustment
Every other rear facing only car seat that I’ve ever met works a bit differently from the NurtureMax in two key ways: 1. the way the handle moves up and down and 2. the way the carrier goes into and out of the base. First, let’s talk about the handle adjustment. There are no buttons or levers, to move the handle between positions, press it down, then push it back. It mostly moves forward without pressing the handle down.
I’ll admit that I’d glossed over this page of the instructions since I do fancy myself fairly skilled at adjusting handle positions. At least I was until I met the NurtureMax, I found myself downgraded to “imposter” status. It turns out that the handle adjusts when you push the handle itself.
Position 1 is the upright/carry position
Position 3 is the handle position behind the child’s head
From the instructions: To change carrier handle positions, push down and rotate the handle to the desired position until it locks into place.
IMPORTANT:
• ONLY use Positions 1 or 3 when traveling in a vehicle.
• NEVER use Positions 2 or 3 to carry your child
Putting the Carrier into the Base
Evenflo NurtureMax hook for carrier
I often joke that removing a carrier from the base is the first test of a new caregiver’s life as a caregiver because (in many cases) they have to remove the carrier from the base because it’s shipped that way. The NurtureMax ships with the base nestled inside the carrier so I didn’t fully experience the uniqueness of removing this carrier from the base/putting the carrier into the base until I started working with the seat.
Where every just about other rear facing only car seat that I’ve met attaches to the seat by basically dropping or gently lowering it directly into the base (from you know, RIGHT ABOVE THE CARRIER in case anyone thinks I’m advocating for dropping babies in car seats from any height at all ever), the NurtureMax has a one inch long plastic beak at the edge of the base. To get the carrier into the base, line the middle of the carrier up with the beak, then tilt the carrier up just a bit, then drop it down into the carrier. Once it’s in the carrier, make sure the plungers on the side of the carrier are visible through the little holes in the sides of the base.
This was the first time I couldn’t figure out (first) how to get a carrier into a base and then how to get that carrier out of the base without reading the instructions.
Here’s what the manual says:
Tilt front feet of infant car seat down so that front edge goes below hook on base (see image) and allows seat to rotate down. Plungers will disappear into the base and reappear in windows when locked.
NOTE: Ensure Adjuster strap is inside the child restraint before placing front edge of seat under base hook.
Translation: tuck the edge of the carrier under the hook on the inside of the base, then push the carrier away from that hook until it slides into place and the plungers disappear into the base. I found that the small tilt up once the edge of the base is under the hook is the key to getting the carrier into the base.
Removing the carrier from the base is equally challenging at first. If the carrier isn’t exactly in the right position, it will get stuck in the base, and, if you’re not careful, it will smack you in the face when you finally wrestle it out. I cannot imagine doing this task with an actual child in the seat. Which kind of defeats the point of using this type of car seat. I will continue to practice this move but always worry when a critical piece of the useage of the seat is this difficult. If it’s challenging for me, it’ll likely be challenging for caregivers.
There’s definitely a learning curve to this task, I required help from our friends at Evenflo to figure it out, I’d suggest that any caregiver who is using this seat practice putting it into and removing it from the carrier before baby arrives.
Recline Angle Adjuster and Indicator
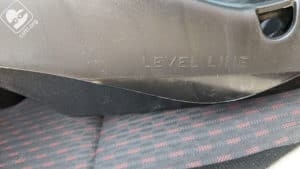
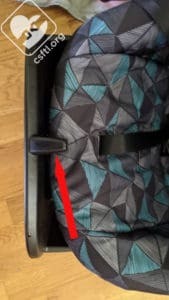
Evenflo NurtureMax level line
The NurtureMax’s base is so basic (and lightweight!) that it doesn’t have any way to adjust the recline angle. It does have a foot that’s molded into it and a line for the recline angle indicator. I did find that it fit well enough in my vehicle that the line was at the right angle but it’s something to look out for. A rolled towel is permitted to help with adjusting the angle, if needed.
Installation with the Base
Lower Anchors
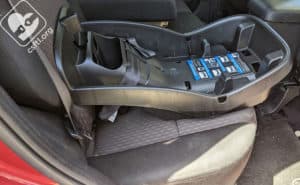
Evenflo NurtureMax base installed with lower anchors
My record for reviewing car seats when it’s unseasonably hot continues. Today, it’s a 100 degree day in May so that’s obviously the perfect time to head out to my car and install the NurtureMax for this review! To install the NurtureMax with the base, remove the carrier from the base (if it’s still attached) by squeezing the handle at the back of the carrier, then tilting it toward the front of the base and lifting it off the base at exactly the right angle for the plungers to disengage.
Squeeze the release button on the lower anchor connectors, then pull the webbing to extend it and remove the lower anchor connectors from the base. Set the base on the vehicle seat and attach the lower anchor connector that’s the furthest away from you to the lower anchor in the vehicle. Attach the other lower anchor connector, then thread the tail of the webbing up through the belt path. Push down on the base with one hand while pulling straight up on the webbing with your other hand. When the slack is removed, release the webbing and check your work by giving the base a firm handshake at the belt path. It should move less than one inch.
I found installing the base itself to be quite easy. So that’s great news. However, I found that the interaction between the carrier and the base was challenging — there’s a trick to attaching the carrier to the base (and if I didn’t do the movement correctly, the seat would not release from the base!) I cover this challenge in depth in the section just above this one.
Vehicle Seat Belt
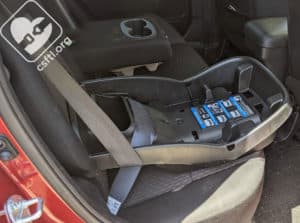
Evenflo NurtureMax base installed with vehicle seat belt
Installing the NurtureMax’s base with a vehicle seat belt is not a lot different than installing it with lower anchors. Set the base on the vehicle seat, thread the vehicle seat belt through the belt path, then buckle it in. Press down on the base with one hand while pulling the slack out of the shoulder portion of the vehicle seat belt with the other. Once all slack is removed, hold the belt in place and pull the seat belt all the way out from the vehicle to engage the retractor and put the seat belt in child seat mode. Feed the slack back into the vehicle until the seat belt is snug. Check your work — the base should move no more than an inch at the belt path.
Installation without the Base

Evenflo NurtureMax carrier with cover edges in
The NurtureMax can also be installed without the base, though this aspect of the installation also has some uniqueness to it. The cover covers the belt guides so the seat includes a giant page of instructions around moving the fabric cover away from those belt guides before use. This translated to the extra fabric flopping a bit inside the seat but the belt guides themselves are quite nice, big enough to easily thread the seat belt through. Evenflo let us know that as of fall 2022, the fabric will fit around these guides and they’ll be more accessible at that time.
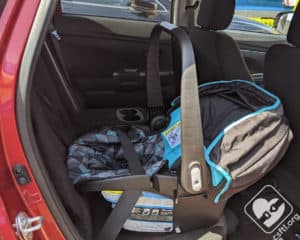
Evenflo NurtureMax installed without the base
Once the fabric is out of the way of the belt guides, set the carrier on the vehicle seat with the harness facing the back of the vehicle. Thread the vehicle seat belt through the belt guides on the edges of the carrier, then press down on the seat to remove slack from the shoulder portion of the vehicle seat belt. Once all slack is removed, hold the belt in place and pull the seat belt all the way out from the vehicle to engage the retractor and put the seat belt in child seat mode. Feed the slack back into the vehicle until the seat belt is snug. Check your work — the base should move no more than an inch at the belt path.
Fit to Child
Preemie Doll
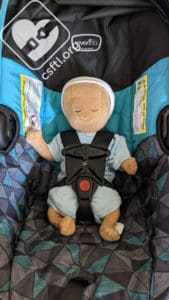
Evenflo NurtureMax preemie doll
Since the NurtureMax is rated down to 4 pounds, we tasked our preemie doll with modelling this seat. Our doll weighs 4 pounds and is 17 inches long. With the harness straps in the lowest slot, our doll had a good harness fit in this seat.
Newborn Doll
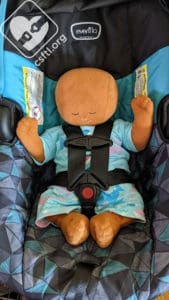
Evenflo NurtureMax newborn doll
Our newborn doll weighs 7 pounds and is also 17 inches long. With the shoulder harness on the second slot, the harness fit our doll well. That’s absolutely what we would expect from an Evenflo carrier and the NurtureMax delivers.
Important Information: Where to Find
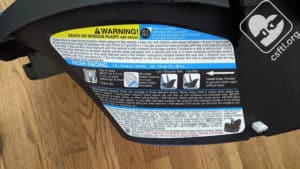
Evenflo NurtureMax FAA approval label
FAA approval label: the NutureMax is approved for use on aircraft. The label is on the outside of the shell of the carrier.
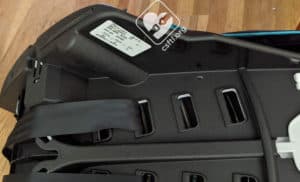
Evenflo NurtureMax date of manufacture label
Date of manufacture label: the NurtureMax has a 6 year expiration. Note: this information is listed on the label but not in the manual. The label is on the underside of the carrier, there’s an additional label on the top of the base.
Manual storage: the manual lists the storage location at the very end of the manual. I often find the manual storage location in the seat diagram at the front of the manual so I had to get a little help to find it, the NurtureMax manual has this information on its own page at the end of the booklet. The manual stores underneath the seat pad, near the handle.
Overall Thoughts
I went into this review expecting to find that the NurtureMax is a very well priced seat with a lot to offer. Unlike some other CPSTs I know, I have not had the opportunity to spend time with the original Nurture so the handle, the connection to the base, and the location of the manual storage location diagram were unfamiliar to me.
I have, however, spent a LOT of time with the NurtureMax’s cousin, the LiteMax (it’s a staple of the injury prevention program at the hospital I work for) so I expected the NurtureMax to behave similarly. It just doesn’t. The NurtureMax has its own set of uniqueness. The interaction between base and carrier was challenging until I understood that this seat is just different and it’s a much-needed improvement over the Nurture. There’s a learning curve but once I got past it, the seat did what it needed to do — provide a solid harness fit and an extremely lightweight seat at a very reasonable price. I’d suspect that new caregivers who have never used a car seat (in other words, they have little to no expectation about how a car seat should work) will find the NurtureMax a solid option.


